
Like many engineers, I have a life-long passion for learning. I satiate this need by creating side projects that explore new concepts, languages, and tools. Some of my side projects have been successful and used by a wide audience. Of course, like many others, I also have a big list of incomplete and abandoned projects. Each project may require it’s own services and other software dependencies, which over time becomes quite hard to maintain on a server. Let’s face it: managing software deployments is almost never the exciting part of a side project and in some cases is the reason we abandon it in the first place. In this article, I’m going to cover my deployment setup used for all of my web-facing projects.
To begin, let’s talk about the server itself and the bare-minimum software I have installed to get underway. I currently use Linode as my VPS provider, but any of the major players work just fine. Linode has server bootstrapping mechanism called “Stackscripts”. I use a custom Stackscript that installs and configures Docker which is a container orchestration manager and is at the heart of deployment automation for my setup. An abridged version of this Stackscript looks like:
#!/usr/bin/env bash

DEBIAN_FRONTEND=noninteractive

apt-get install -y apt-transport-https

apt-get update

apt-get install -y \
  python-pip \
  screen \
  bash-completion command-not-found \
  mlocate \
  htop iotop \
  vim curl wget

wget -qO- https://get.docker.com/ | sh

pip install docker-compose
With the “physical” server preparation out of the way, let’s talk about how apps can safely be exposed to the public internet.
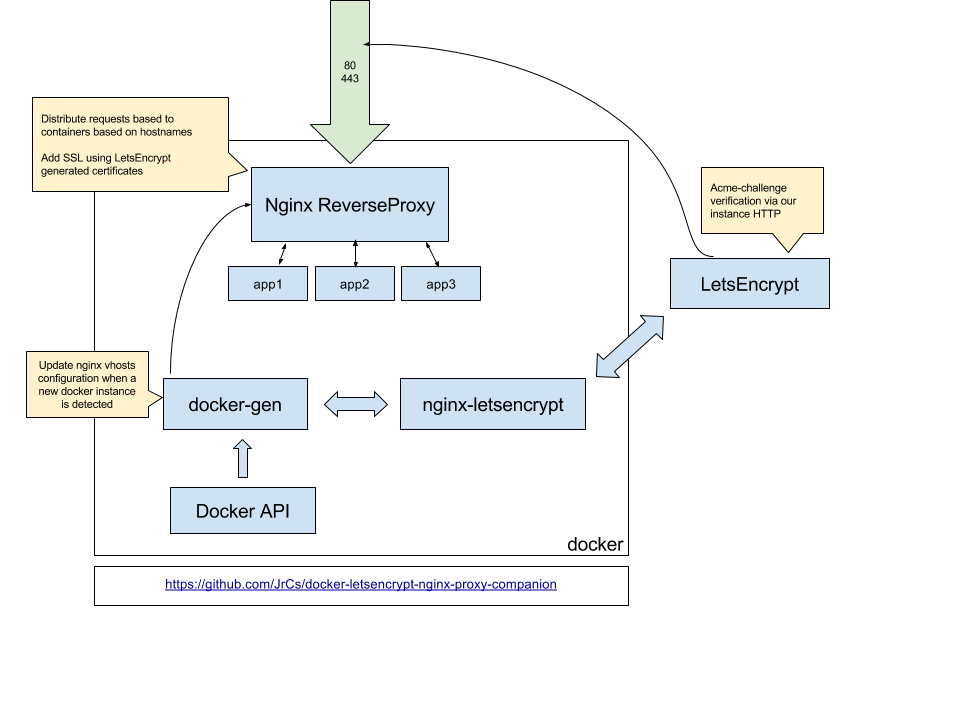
There are two essential Docker images that work together to automate app exposure:
NGINX proxy is a Docker image that utilizes NGINX as a “reverse proxy”, which is essentially a way to pick and choose what we expose to the internet by proxying user requests from the web to the applications.
It uses docker-gen to automatically generate NGINX virtual host configurations from Docker container meta data.
In essence, I can set an environment variable VIRTUAL_HOST=www.example.com on an application container, have the DNS point to the physical address of the VPS, and when that container boots, NGINX proxy automatically writes nginx configuration files, reloads NGINX, and begins proxying connections to the application.
A sample docker container initialization of the NGINX proxy image might look like:
docker run -d \
	-p 80:80 \
	-p 443:443 \
	--name nginx-proxy \
	--network public-nw \
	-v /var/run/certs:/etc/nginx/certs:ro \
	-v /etc/nginx/vhost.d \
	-v /usr/share/nginx/html \
	-v /var/run/docker.sock:/tmp/docker.sock:ro \
	jwilder/nginx-proxy
Note: If you are concerned with having a container exposed to the internet that has a volume reference to the docker socket, you can run
docker-genas a separate container off thepublic-nwnetwork.[4]
The Let’s Encrypt proxy companion works hand-in-hand with NGINX proxy’s docker-gen to make and receive requests to Let’s Encrypt to automate secure SSL certificates.
It is similarly configured like the NGINX proxy image above: setting the LETSENCRYPT_HOST environment variable allows the companion image to configure the certificate creation process[1].
A sample docker container initialization of the Let’s Encrypt image might look like:
docker run -d \
	--name encrypter \
	--network public-nw \
	-v /var/run/certs:/etc/nginx/certs:rw \
	--volumes-from nginx-proxy \
	-v /var/run/docker.sock:/var/run/docker.sock:ro \
	jrcs/letsencrypt-nginx-proxy-companion
Note: The volume for the certs
/var/run/certsmust be the same as specified innginx-proxyabove, otherwise the reverse proxy won’t have a reference to the Let’s Encrypt generated certificates.
Let’s suppose you’ve made a Go application that uses PostgreSQL as its database.
First, you would build the app within a container image that builds and exposes a port to the app via a PORT environment variable[2].
Next, you would pull down a PostgreSQL container image and do whatever configurations your app requires[3].
For this application “cluster”, when creating these two containers, create a dedicated app network via --network myapp-nw.
On the application container, also have it join the public-nw network that contains the reverse proxy.
This will allow the NGINX reverse proxy to be able to talk to your application container, but would not allow it to talk to the PostgreSQL container; meaning PostgreSQL would not be exposed to the internet.
Finally, specify VIRTUAL_HOST and VIRTUAL_PORT for NGINX to proxy, and LETSENCRYPT_HOST and LETSENCRYPT_EMAIL for SSL certificate generation.
The biggest advantage to this setup is the ability to run any application capable of running as a container and have it exposed. Things like your own CI Server, Git server, or even your own data science Jupyter notebook become very easy to deploy.
There are many barriers and excuses for side projects to rot or lay dormant never to see light of day. Don’t let deployments be one of them.
Footnotes
- This may seem like an overkill step if you are using something like Cloudflare’s flexible SSL option, however I like to ensure users of my apps are encrypted all the way to my server, not just to Cloudflare.
- There are many Golang developers that would scoff at building a Go app in a container (since it can compile to a target), however we’re interested only in Docker’s networking ability and container metadata.
- Docker is not great for stateful software like databases. Always have the data written to disk via a volume, or use an external service when the project gets serious. You’re likely to move to an external service anyways if you need to scale horizontally.
- Instructions on how to setup
docker-genas a separate container can be found here.
Further reading
- Jason Wilder’s original blog post which goes over more thorough details on how the stack I describe above works underneath. [web archive]
- What is a reverse proxy?
- Docker networking overview
Credits
- Jason Wilder for his work on these excellent NGINX proxy automation container images, without which much of this article would be much more difficult to setup.
- Featured image by Lee T.